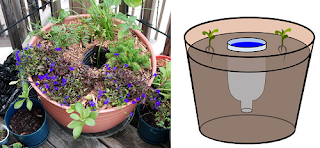
Frugal Tip: Self-Watering Planter Pots

I used to have tons of beautiful plants all over my house - but lately, I have been forgetting to water them often enough. So this tip just might help! Indoors or out!
It helps to keep your plants watered during those long hot spells, or while you are away on trips. Or even if you are like me, and just forget to water your plants regularly!
This works best when you add the plastic bottle as you fill up a new planter pot or transplant your current plants. All you need is an empty plastic bottle about the same height as your planter pot - so a single serving size bottle for small pots and a 2 litre size bottle for large pots. If you don't have the right size bottle, you can just cut it down to fit.
INSTRUCTIONS:
1. Using a craft knife, cut the bottom off your plastic bottle. The bottle should be no taller than the distance from the bottom of the planter pot to the top of the soil line. Remove the bottle cap.
2. Fill your planter pot up partially with soil, and then place the empty bottle, upside down, in the center of your planter pot. Add more soil around the sides so that the plastic bottle stands up, up to the edge of the cut bottle.
3. Add your new plants around the plastic bottle evenly.
4. Water the top of the soil, then fill up the bottle with water. It will slowly trickle down to the deep roots of your plants.
As the plants grow, the bottle opening will become harder to see, but you will still be able to easily fill it up as needed.
~ Idea and photo from: dabbletree.vrya.net ~
From our Facebook fan page:
Sylvie Brucher posted: Thank you! I am so sharing this!
Debbi DeWitt Buettner posted: think it would work also on indoor plants
Carolyn Talley posted: good idea, I forget to water to
Dennise Santillan Combs posted: This is my type of device, I am bad about watering plants
Heather Redding Hollcraft posted: I think it would give mosquitoes a great place to breed. Standing water and seclusion in the plants....
Debbie Wilson posted: This is a great idea!
Jeri Sherrill posted: cover it with plastic wrap u can still see thru it
Rosanna Saraceno Woldridge posted: Put it in right side up after you have poked holed in the bottom and sides. You can keep the top to screw on and off
Going Greener posted: I love the way this is done, great job of reusing and reducing! I also like that it can catch rain water to help, not only on your water bill but help the use of less energy!! Great thinking!
Debbie Mongera Gregor posted: If I did do this I would finish it off with the little elastic -plastic caps like a shower cap to keep the bugs out of the water. Take it off to refill the bottle then recap!
Sonja Ruffin posted: I use the big bottle. I put 2 holes in the cap, fill with water, and place it in the dirt with the plant. Watch bottle to replace water. My sister loved the idea which I got from my mom. She had one in all in potted plants.
NOTE - If any of the above links are not working or the freebies or coupons no longer available, please post a blog comment below and I'll edit it!
◊ Enjoying all the freebies? Want to keep up with the latest free stuff, deals, coupons, and other ways to save money? Subscribe to Frugal Freebies' email updates or RSS Feed! - it's free!
◊ Check us out on Twitter, and join in the conversation of even more great freebies, deals and coupons on our Frugal Freebies fan page on Facebook and Google+. We are even on Pinterest!
More Frugal Blogs and Websites:
◊ Born to Love: All your cloth diapering needs, and much more - naturally! We are strong advocates of the personal, social and environmental benefits of natural parenting.
◊ Frugal Baby Tips: Money-saving tips on diapering, diaper washing, safety, slings and baby carriers, toys, clothing, nursing, menstrual needs, traveling with kids, more!
Category: d-i-y, DIY, do-it-yourself, feature, frugal tips, make-your-own, recycle, reduce, reuse, saving money


0 comments